Do I really need a strategy?
Yes.
A fresh application always starts out as that one application that’s going to be designed for easy maintenance and development.Unfortunately, it’s just a matter of time until that application becomes non-trivial and needs reorganisation and/or a rewrite. In those moments, it helps if you’ve designed your application in a way that’s easy to refactor and, with some forethought (and luck), a reorganisation might not even be necessary. A bigger application usually also means a bigger team consisting of people with varying degree of front-end and Angular knowledge. Having a clear set of guidelines regarding the architecture and coding style pays off very fast.
The aforementioned problems are exactly the problems we faced while building an application that gets more than 10 million visitors each month. After a while, developing a feature becomes a chore. The same questions always pop up:
Where do I put this piece of code?
How do I modify data?
How come this event changed my data and state?
Why does modifying a piece of code suddenly break more than half of my unit tests?
It was clear — we needed a new direction.
Setting a direction
Our goal at that point was to have something that’s easy to develop, maintain and test. If we accomplish that, there’s a good chance that our application is going to be future-proof as well.
This article aims to tell the story of a better architecture but also to provide a working example of all the principles discussed here. That’s why you’ll find an accompanying repository with an interactive demo application. Details of the repository and how it relates to this article will be discussed later.
Separation of concerns
Looking at the problem from a different angle, we’ve noticed that the biggest problem was writing tests that are not too brittle. Easy testing means that mocking various parts of an application is easy which lead us to the conclusion that we need better separation of concerns.

That also meant we needed a better data flow; one where it’s completely clear who provides and modifies data and who (and how) triggers data changes. After a few initial sketches, we’ve come to a rough sketch of a data flow that resembled React’s Flux. It’s pretty clear how data flows in a flux(-like) application. In a nutshell — an event (e.g. user or callback) requests a data change from a service which modifies the data and propagates the changes to components that need that data. This in turn makes it easy to see who triggered a data change and there’s always one data source.
Better tooling
One thing that made our life easier was using a language that transpiles to JavaScript. That’s also something that I would wholeheartedly recommend. The top two contenders right now are TypeScript and Babel. We chose TypeScript because the tooling made it easier to notice errors at compile time and refactor bigger pieces of code.
Future proofing
Future proofing means having an application that’s easy to maintain but also reasonably easy to upgrade. It won’t be long before Angular 2 becomes production ready and a sane architecture with TypeScript goes a long way in making the gradual upgrade easier.
The bare necessities
What follows is a list of advices I expect developers of a sane Angular application are going to follow:
separate your concerns,keep the flow of data unidirectional,manage your UI state using data,use a transpiled language,have a build process in place,test.
Let’s dive into each one of them.
Separating concerns
When each layer of an application can function as a separate entity, doesn’t know too much about the system (layers that aren’t in direct contact) and is easily testable, you’ll have an application that’s a joy to work with. Angular offers building blocks that lend itself to such a separation of concerns. If you want a deep insight into the subject, check out this blog post.
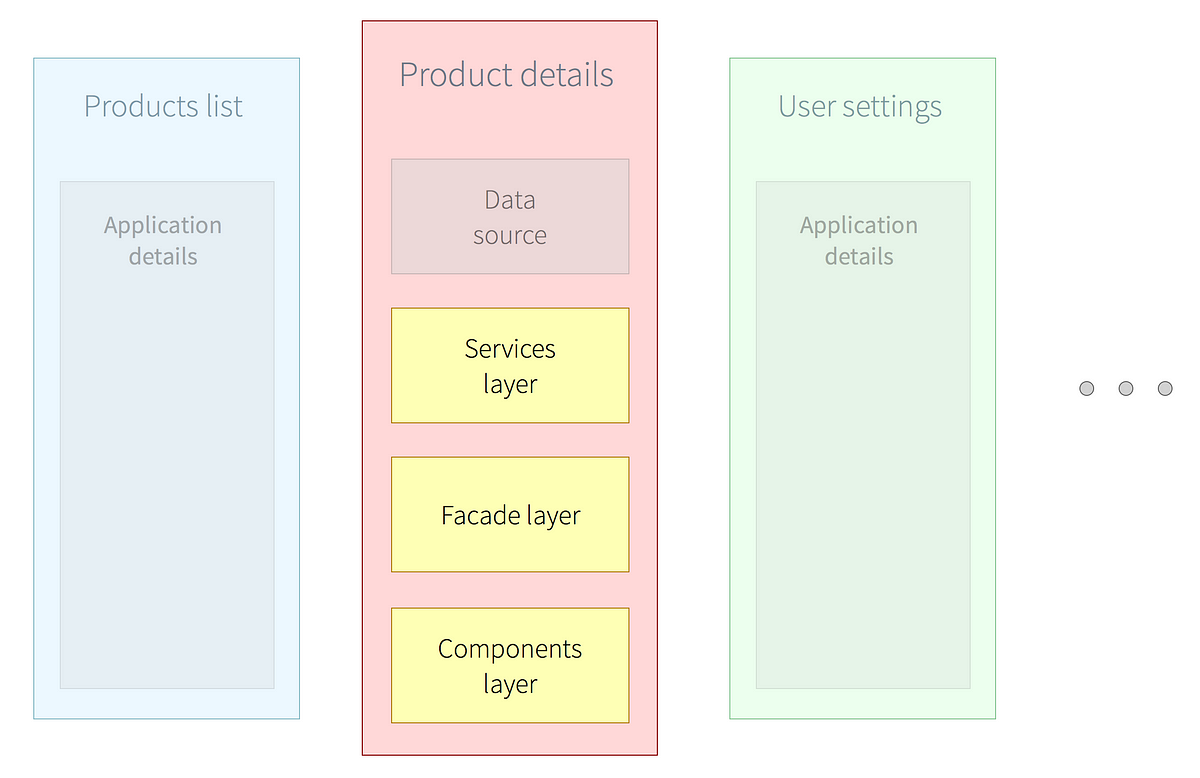
Vertical separation
Concerns can be separated horizontally and vertically. Vertical separation happens when you split an application into verticals. Each vertical has a life of its own and internally should have horizontal separation. What worked best for us, was completely separating parts of the application (e.g. separate home page, details page, configuration page, etc.) into standalone web pages that each initialise an Angular application. Communication between these modules is easy and achievable by using standard techniques like sessions, URL parameters, etc.

Horizontal separation
Where it gets interesting is horizontal separation. That’s where you actually build up your Angular application and place all its building blocks. It’s important to note that each layer (and block inside a layer) only knows about the layer above itself and doesn’t care about layers underneath that are going to consume its exposed functionalities.
Each vertical features a similar structure:
services layer,facade layer,components layer.
Components layer
The components layer is the layer that the users can interact with.It contains directives with accompanying HTML templates and controllers. When testing (and conceptually designing), directives and HTML templates build one block and controllers build the other block of this layer.
The reason is simple — testing controllers is easy because they can be tested without a dependency on Angular. This exact feature of controllers makes them also the perfect place to put any functionality your directive requires. The preferred way then, would be to use controllerAs and bindToController in directives to build up components.
Blocks in this layer get parts of the facade layer injected and, through these, can pull data and request data modification.
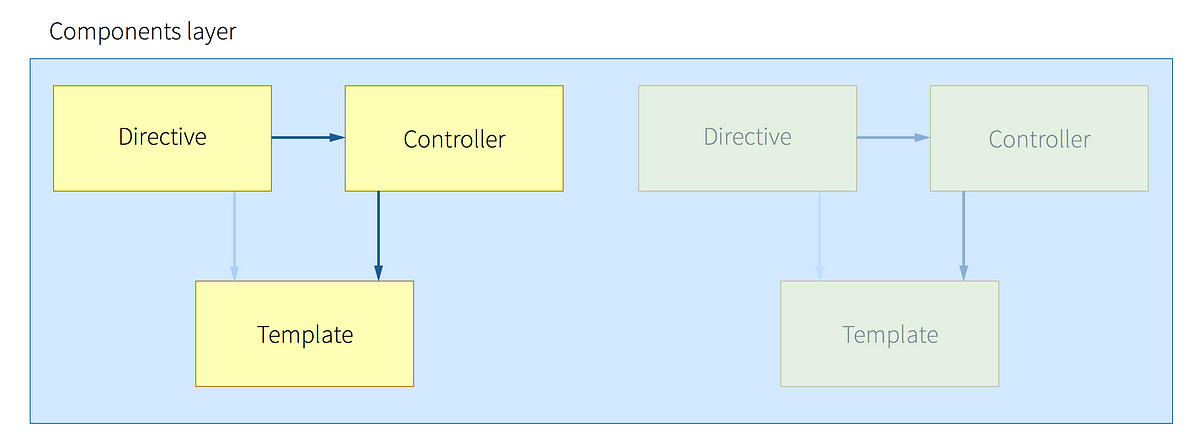
A question often pops up in this layer — are we going to reach data to a component through isolated scope or get a service injected and request it?
The answer to that question is not always clear and involves using common sense.Smaller, reusable components without child components are a clear candidate for getting data through isolated scope and directly using that data.Components featuring child components or more logic often benefit much more from getting their data through an injected service because they don’t get coupled to their parent.
Facade layer
The facade layer is an abstraction layer. A facade is defined as follows:
A facade can (…) reduce dependencies of outside code on the inner workings of a library, since most code uses the facade, thus allowing more flexibility in developing the system.
In our architecture, its only job is abstracting the back facing part (services layer) from the front facing part of your application (components layer). The blocks in this layer are services whose methods get called from the components layer and are then redirected to corresponding services in theservices layer.
It’s that simple.
But also powerful, because such an abstraction is easy to split up and changes done to the services layer never affect your components layer.
Services layer
The services layer features all the smart things your application is supposed to do. Be it data modification, async fetching, UI state modification, etc. This layer is also the layer where your data lives and gets handed to the components layer through the facade layer.
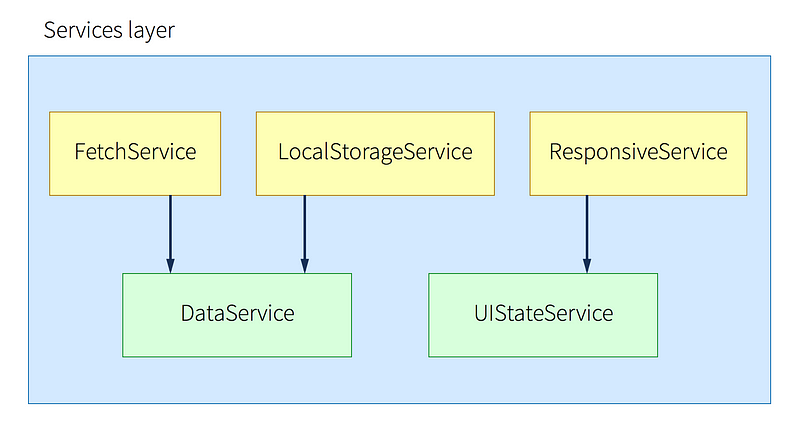
This layer is typically going to feature:
services that handle your data or UI state (e.g. DataService andUIStateService),services that assist them in doing so (e.g. DataFetchService orLocalStorageService) andother services that you may need like a service that’s going to tell you at which breakpoint in a responsive layout you are.
Keeping the flow of data unidirectional
Now is the time to explain how all the layers and blocks fit together in a unidirectional flow of data.
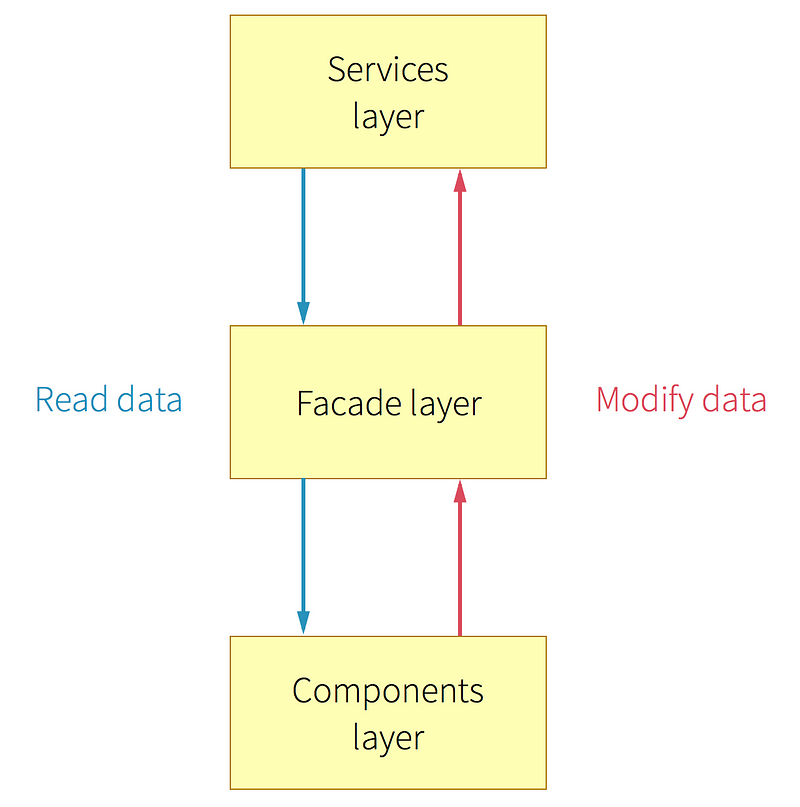
Getting data
The services layer features services that know how to get data. The initial set of data is either already present as part of the HTML, asynchronously fetched or hardcoded. This data gets transformed into objects (your models) and is available through methods present on the services in your services layer.
The blocks in the components layer can now make a request for the data through the facade layer, get the already parsed data and display it. Easy.
Modifying data
If an event happens that should modify data, the blocks in the components layer make a request to the facade layer (e.g. “refresh list of users” or “update the contents of this article with this data”).
The facade layer passes the request to the correct service.
In the services layer, the request gets processed, the needed data gets modified and all the directives get the new data (because it was already bound to the directives). This works thanks to the digest cycle. Most events that happen are going to trigger a digest cycle which will then update the views. If you’ve got an event that doesn’t trigger the digest cycle (like a slider’s slide event), you can trigger a digest cycle manually.
Keep it flowing
As you can see, there’s only one place in your application that modifies your data (or a part of it). That same place provides that data and is the only part where something wrong with the data can happen which makes it much easier to debug.
Managing UI state using data
A larger Angular application is probably going to feature various states in which it can find itself. Clicking on a toggle can lead to the change of a tab, selection of a product and highlighting of a row in a table, all at the same time. Doing that on the DOM level (like jQuery manipulation) would be a bad idea because you lose the connection between your data and view.
Since we’ve already established a nice architecture, let’s use it to manage our UI state. You’d create a UIStateService in the services layer. That service would hold all relevant UI data and modify it if needed. Like already explained, that service would provide that data but also be in charge of modifying it. The facade layer would then delegate all needed changes to the correct service(s).
It’s important to note that a UIStateService might not be needed. Since views depend on data, most of the time it’s possible to just use that data and control the state of the views. A separate state service makes sense when you have to manage UI state that’s completely separated from your model.
Transpiling code
There are many benefits to transpiling from a language to JavaScript. A few obvious ones are:
using features that are coming in newer versions of ECMAScript,abstraction of JavaScript quirks,compile time errors,better tooling…
You can transpile from future versions of ECMAScript with Babel or even add typing support with TypeScript or Flow. You can’t go wrong with either of these choices because, at the end of the day, you get usable JavaScript. If any of the tools ceases to exist, you can continue working with the generated JavaScript.
TypeScript
Seeing as how the Angular Team teamed up with Microsoft and are basing Angular 2 on TypeScript, it is safe to assume that the support for that stack is going to be really good. In that sense, it makes sense to get acquainted with TypeScript.
Aside from offering type safety, TypeScript has really good tooling support with editors like Sublime, Visual Studio Code or WebStorm which all offer autocompletion, inline documentation, refactoring, etc. Most of them also have a built-in TypeScript compiler so you can find compile-time errors while coding. The great autocompletion and inline documentation is possible because of type definition files. You would typically get a type definition file, put it in your project and reference it — the mentioned features work then out of the box. Visit DefinitelyTyped to see which libraries and frameworks are supported (hint: odds are, you’re going to find every library or framework you use there) and then use tsd to easily install them from the CLI.
The team at Angular is proposing a concept where libraries directly include the type definition files. The benefits of that approach are two-fold: there’s no need to search for type definition files and the type definition file you get with a version of a library always corresponds to the API of that version.
To get a quick look at all the benefits of developing with TypeScript, you can watch this video from Angular Connect.
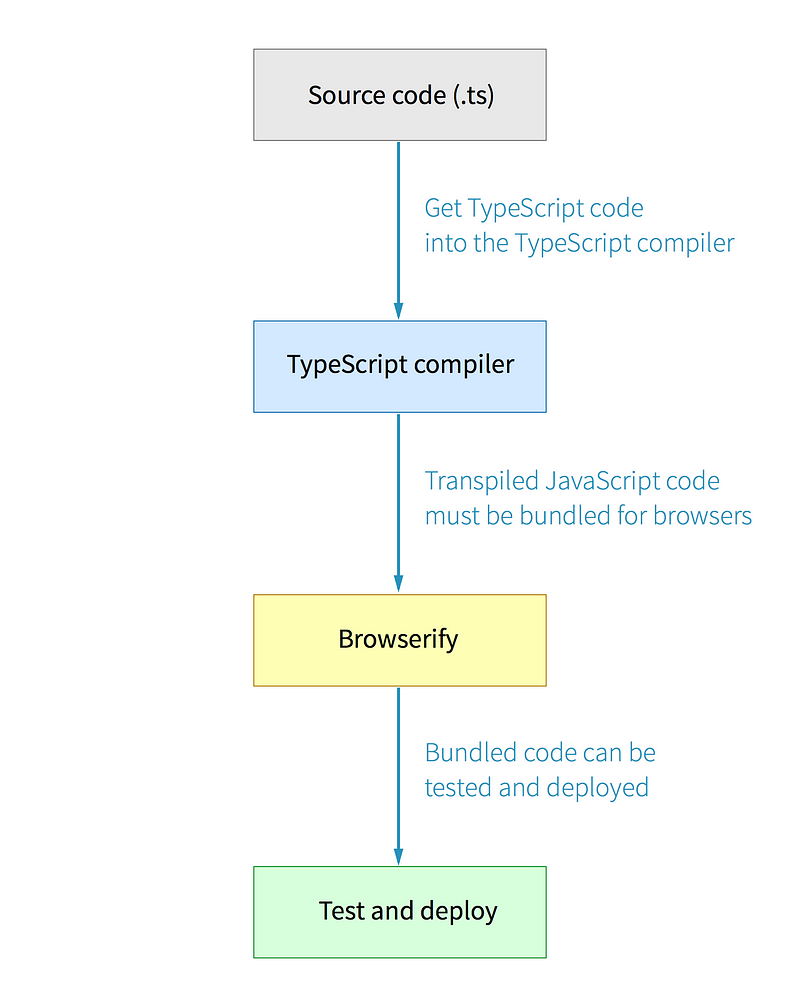
A switch to TypeScript is mostly painless because valid JavaScript code is valid TypeScript code. Just change the file extensions to .ts, put a TypeScript compiler in your build process and you’re good to go.
Speaking of build process…
Having a build process in place
You do have a build process in place, don’t you?
If not, pick Grunt, Gulp, Webpack or whichever build/packaging tool you’d like to work with and get going. The repository accompanying this article uses Gulp, so you can get an idea how the code gets transpiled, packed for the web and tested and I won’t go into details on build tools because there are many articles out there detailing them.
Testing
You should test all parts of your application.
I see quite often that people leave out testing HTML templates because they’ve got integration tests. Unfortunately, Angular won’t let you know if you’ve got a typo somewhere in your template and integration tests can get big and slow very fast while still not covering enough ground (not to mention the time needed to maintain them).
The point is — with a good architecture in place, testing is easy because you only test code you’ve written and mock away all dependencies. Angular’s dependency injection plays a big role in this as well and testing with Angular is straightforward.
A combination of Karma as test runner and Jasmine as testing framework is probably going to be enough for all of your test cases. Testing in your build process (between transpiling and packaging) is also going to make sure you’re not introducing regression bugs.
Testing directives means separately testing the directive definition with its accompanying template and controllers.Controllers are easy to test because they just get instantiated with all of their dependencies mocked away and you can get straight to testing its insides. Most of the time, you’ll just be testing if your controllers delegated to the correct service in the facade layer.Instantiating directives and mocking away their controller is also easy because the controller is present at the compiled element after Angular’s compilation. To test what’s happening in a template, change the controller or scope mock and run a digest cycle. The new values should be present.
Testing services in the facade or services layer is just as easy because you can mock away every dependency and really test only the code that’s present.
That’s also the main take-away here — test code that’s present in the component you’re testing. Tests should fail if you modify the public methods of a component, but only tests that are associated with that component and not half of all your tests. If writing tests is hard, you’re either testing too much (and not mocking away enough) or have a problem with the architecture of your application.
Real world example

As part of this article, you can check out and play with a demo application here.
It’s a deck management application for card games. Games like Hearthstone, Magic the Gathering and similar have players building decks from an ever-growing collection of cards and battle against each other. You can create and manage decks with a pre-built array of custom made cards taken fromHearthCards.
Source repository
What we’ll discuss here is the repository from which the demo application was built and you can find that repository here. The idea behind this repository is to give you a working application that explores the ideas discussed in this article and a nice cheat sheet when you’re not sure how to implement a feature in Angular using TypeScript.
To get started, clone the repository and follow the README. That’s going to start up your server and serve the compiled Angular modules.
For easier work later, I recommend starting a watcher in each vertical by running gulp watch. Now, each time you modify a file inside of a vertical, Gulp is going to compile and test your changes.
Vertical separation
The application is divided into three verticals: common, deckmanager anddeckbuilder. Each of these verticals is an Angular module. The commonmodule is a utility module and gets injected into other modules.
Horizontal separation
All verticals feature a similar structure which follows what we’ve already discussed here in the article. You’ll find the directories components andservices where the components directory contains directives, controllers and templates making it the components layer and the services directory where you’ll find the facade and services layer.
Let’s explore the layers.
Services layer
The deckmanager vertical is a good candidate because it features a data managing service and a UI state managing service. Each of these services has its own model consisting of objects that they’ll manage and provide.
DataService, further more, gets LocalStorageService from the commonmodule. This is where separation of concerns pays off — the data (decks and cards in the decks) are going to be stored into local storage. Because our layers are decoupled, it’s easy to replace that storage service with something completely different.
If you take a look at the DataService in the deckbuilder vertical, you’ll see that we’re also injecting a PageValueExtractorService. That service allows us to have pre-populated data in HTML that gets parsed and used right away. This is a powerful technique that can make application startup much faster. Once again, it’s easy to see how trivial it is to combine data storage strategies and, if we decide to change the concept completely, our components won’t notice it. They just care about getting the right data, not how it got there.
Facade layer
Let’s look at the facade layer and see how it works in practice.
github:5c7d71f5a4005dd11cdd
The FacadeService gets the DataService and UIStateService by injection and can then further delegate logic between the other two layers.
If you look at the createNewDeck() method, you can see that the FacadeService isn’t necessarily just a delegation class. It can also decide simple things. The main idea is that we want a layer between components and services so that they don’t know anything about each other’s implementation.
Components layer
The structure of components includes the directive definition, a template and a controller. The template and controller are optional but, more often than not, they’re going to be present.
You can notice that the components are, for a lack of better words, dumb. They get their data and request modifications from the facade layer. Such a structure yields two big wins: less complexity and easier testing.
Take a look at a controller:
github:ba8bf39b146b47c6b7cc
A quick glance makes it obvious that this component provides CRUD functionalities for our game decks and that it’s going to be really easy to test this class.
Data flow
As discussed in the article, the data flow is going to feature components using the facade layer which is going to delegate those requests to the correct services and deliver results.
Because of the digest cycle, every modification is going to also update the values in the components.
To clarify, consider the following image:
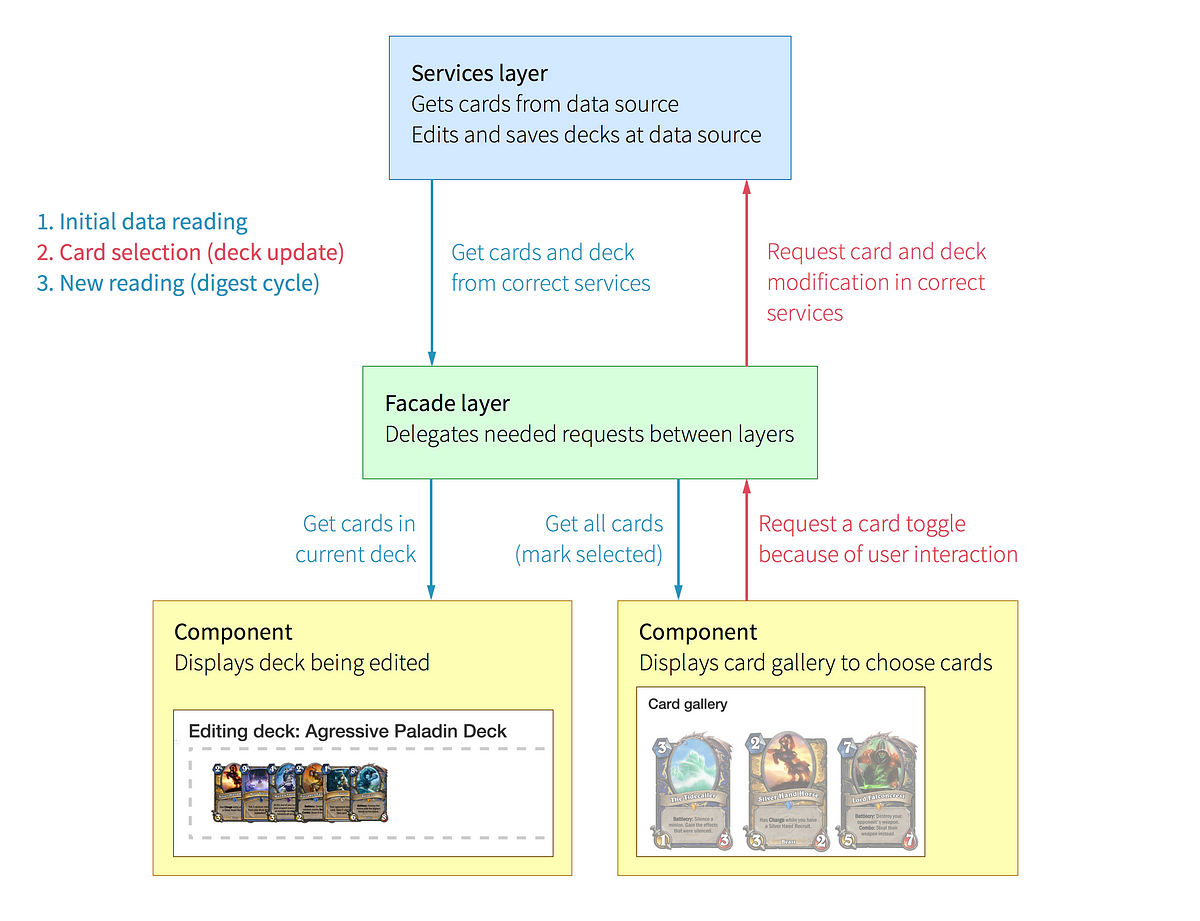
This image shows the data flow when a user clicks on a card in the Deck Builder. Even before the user interacts with the card gallery, the application has to read the contents of the current deck and all cards supported in the application. So, the first step is the initial pull of data that happens from the components through the facade to the services.
After a user clicks on a card the facade layer gets notified that a user action needs to be delegated. The services layer gets notified and does the needed actions (updating the model, persisting the changes, etc.).
Because a user click using ngClick triggers a digest cycle, the views are going to get updated with fresh data just like it happened in the first step.
Under consideration
The application is tested and features a simple build process. I’m not going to dive deep into these topics because the article is big enough as is, but they are self-explanatory.
The build process consists of a main Gulp configuration file and little configuration files for each vertical. The main Gulp file uses the vertical files to build each vertical. The files are also heavily annotated and shouldn’t be a problem to follow.
The tests try to be limited just to files that they’re concerned with and mock everything else away.
What now?
The application has lots of places where it could be improved upon:
additional filtering of cards by cost, hit points, attack points or card raritysorting by all possible criteria,adding Bootstrap’s Affix to the chosen cards in the deck builderdeveloping a better Local Storage service which has much better object checking and castingfurther improving the Page Value Extractor service to allow for metadata being included in the JSON for better type associationetc.
If you check the source code of the application, you’ll notice that there are comments marked with TODO. It’s possible to track these comments in IDEs and text editors (WebStorm and Visual Studio Code do it out of the box, Sublime has several plugins that support it). I’ve included several TODOs that range from new features to improvements and you’re very welcome to fix them and learn a few things along the way.
The devil is in the detail
The points discussed in this article mostly deal with big picture stuff.
If you want to find out about implementation details that can creep up while developing an Angular application, watch this entertaining video from Angular Connect about the usual errors in Angular applications.
Another great resource is this blog post by a developer who re-built the checkout flow at PayPal with Angular.
Back to the drawing board
We have a working application and an idea on how to structure our applications. It’s time to go back to the drawing board now and see if this can really be considered a win.
Consider the demo (tutorial) application that’s featured at the official Angular 2 page — John Papa’s Tour of Heroes. I’ve linked directly to the sources so you can click through the various parts of the application source code. What you’ll notice right away is how similar it feels to the application that’s part of this article. Also, you’ll notice that the take-aways from this article can easily be applied to this application as well — just take the logic out of the components and add layers for a better data flow.
The biggest advantage of developing a well-structured Angular application with TypeScript is the future-proofing that you get. Angular 2 is shaping up to be a great framework and easier to use than Angular 1 with lots of sugar (like annotating components).
Why not, then, upgrade our knowledge for things to come?