INTRODUCTION
Cloud, cloud, cloud. Everyone is talking about the cloud these days. But not everyone has the opportunity to use a public cloud service (regulatory+company policies). In this blog post, we will explain the concepts of installing and configuring a private cloud infrastructure using open source software. We will give you an overview of our lab setup and the capabilities that are offered by using OpenNebula infrastructure.
Many companies do not want to use public clouds like AWS, Microsoft Azure or Google Cloud. They want to use the hardware in their own data centers and leverage them cloud-like.
The most notable project here is OpenStack which is big and complex. As a great alternative, we suggest using OpenNebula. OpenNebula provides the most simple but feature-rich and flexible solution for the comprehensive management of virtualized data centers to enable private, public and hybrid IaaS clouds. With its key features (Data Center Virtualization Management + Cloud Management) OpenNebula enables the user to setup a multi-tenancy environment with simple cloud GUI interface, service elasticity/provisioning, capacity and virtual appliance management, resource optimization and High availability.
Did we mention that it is licensed under the Apache license and that is an “Open source software” :) In this blog post, we will focus on setting up the hardware environment as well as the software installation and management of an OpenNebula cluster.
HARDWARE SETUP
In this Lab project we used this hardware:
- 2 Intel Nuc
- 1 USB 1G Netgear Ethernet adapter (used by the core router)
- 1 NETGEAR ProSAFE Plus GS116E 16-port Gigabit Ethernet Switch (VLAN support)
- 1 Uplink to the Internet
We have decided to create a physical topology at the start of the project to better understand and configure the logical topology.
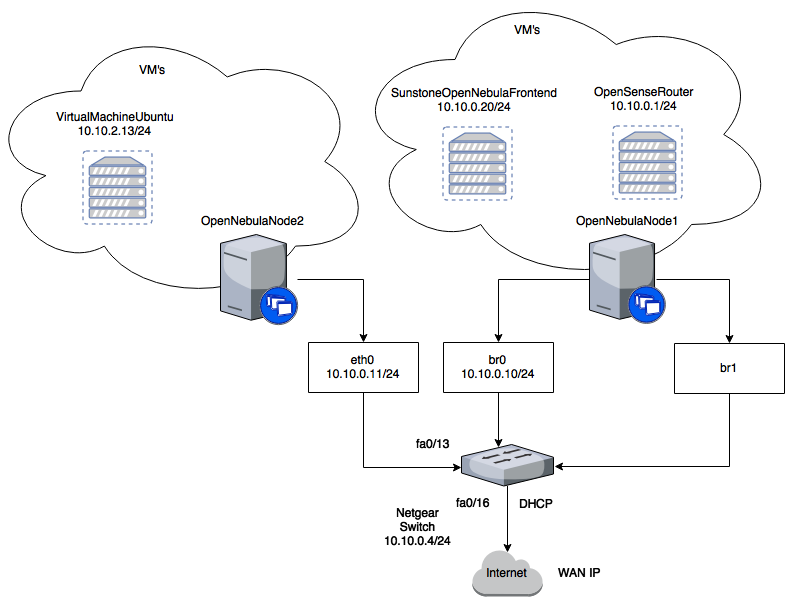
The 2 NUCs are connected to the switch via ethernet cabling.
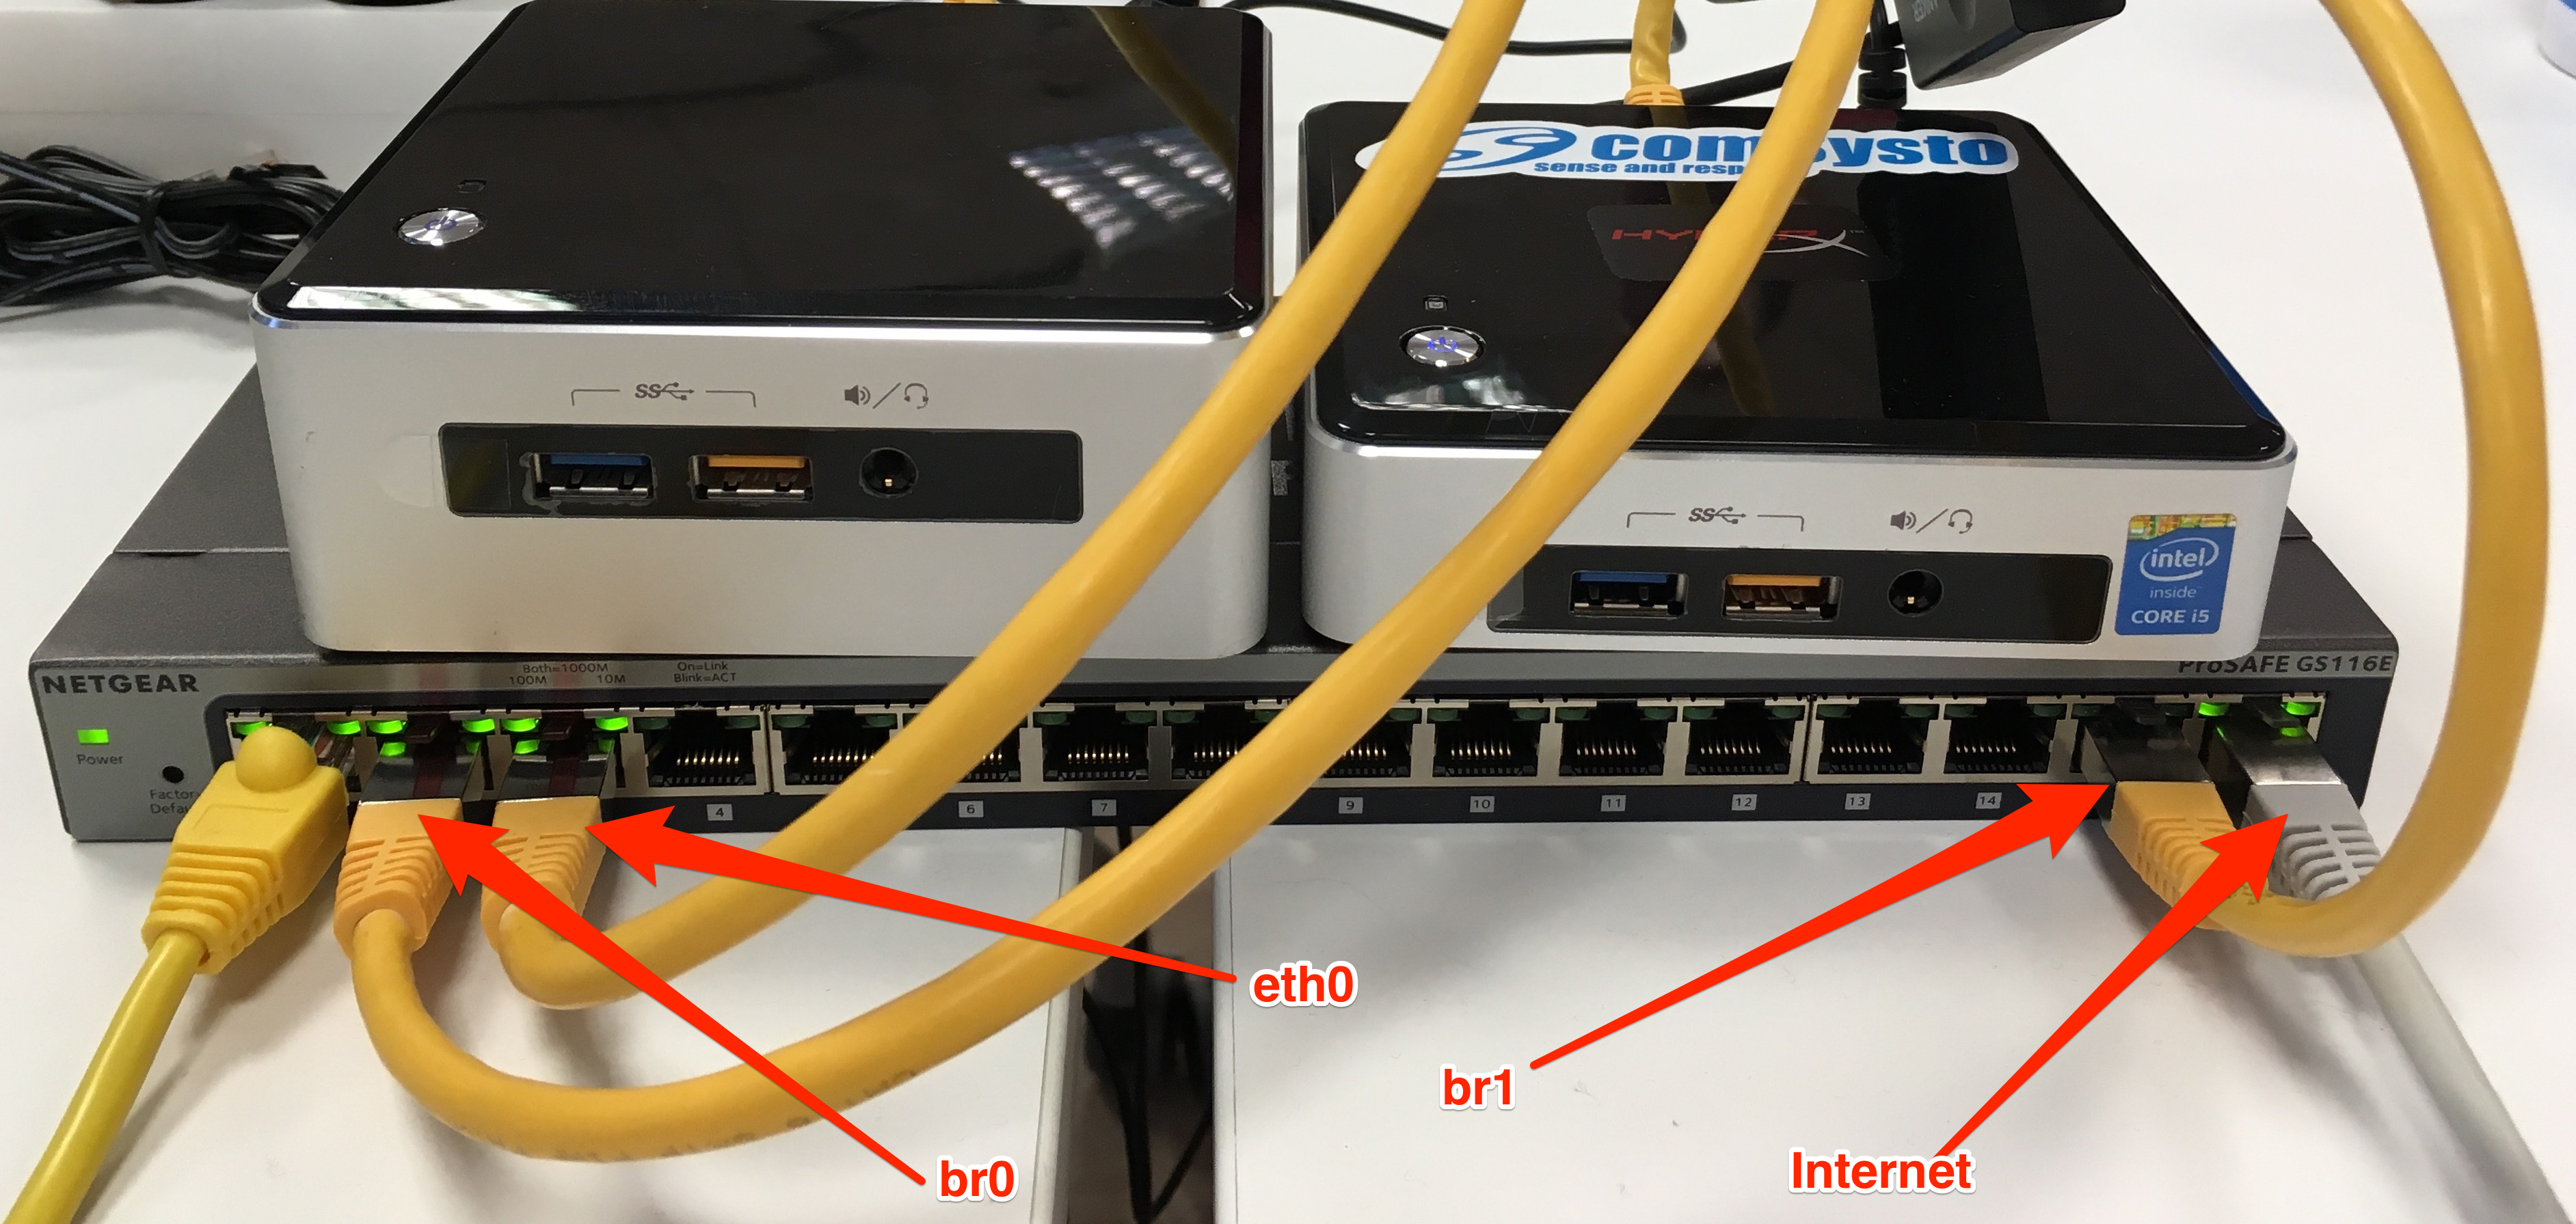
Furthermore, one NUC which hosts a VM of Router Appliance OPNsense is exclusively using the USB Ethernet Adapter, so it can configure VLANs on it. We will not go into detail of setting up the NETGEAR switch since it’s proprietary hardware and it can be different from setup to setup (someone else would prefer Cisco or Microtik or some kind of 3rd option).
We decided to separate our “data center” into multiple VLANs so that the VM’s network is separate from the hypervisor networks. Configuration is done like this:
github:aaeacb552426300439291d4317548ec9
After the initial brainstorming we went to configure the Netgear switch:
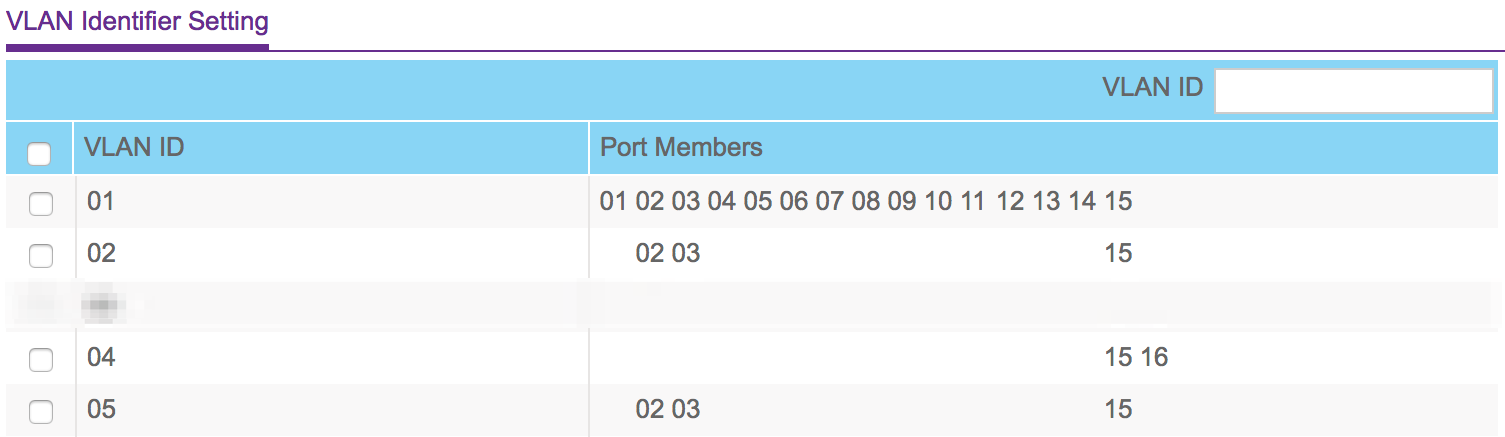
And now the individual port memberships for each VLAN:

- Notice how the traffic in VLAN1 is untagged

- While the traffic in VLAN3 is tagged on ports 2,3 and 15

- Port 15 is tagged
The choice is up to you how you will segment the network (depends on your needs).
It is important to set “tag” on the individual interface as needed so that your network router can identify the individual data traffic (configuration varies depending on your switch)
SOFTWARE SETUP
The software setup part is the fun part of the project :D. As a base OS, we used CentOS 7.
Don’t forget to disable SELinux after OS installation since it could cause problems with the OpenNebula software.
After that, we made an initial configuration of the OS (ssh access, network, hostname). Since OpenNebula is a well-documented project, we will not go into detail of the base setup. The base setup is well explained and available in the documentation.
The main focus in this process is to properly install and configure the Front-end (Sunstone) and the OpenNebula Nodes. Follow the steps in the documentation and be sure that everything is in working order before you proceed to the next step. It is of the utmost importance to have a complete overview of the network setup (on your local firewall appliance, router and OS level with firewalld/iptables) because this is the tricky part, especially when using VLAN’s and security groups. It is easy to get confused ant to make a wrong entry. It also get’s more troublesome if you use a virtual router as we did. In that kind of setup where you dedicate a physical ethernet device to a virtual machine, network troubleshooting can be slow and painful.
That’s why you should plan your network infrastructure ahead (ask co-workers more experienced in networking to help you out with the initial design)
After the initial installation, you shouldn’t forget to test your CLI command and check that OpenNebula is up & running.
shell:onevm list
github:55c95f0e8aab8072fe4f2de2b3325108
Also, a very important part of the OpenNebula setup is the configuration and usage of ssh keys for the oneadmin user (it is used to connect from the frontend to the OpenNebula nodes). This is a crucial part; if you don’t configure this part correctly, OpenNebula front-end will not have the capability to provision and manage the nodes.
shell:ssh-keygen
When prompted for password press enter so the private key is not encrypted.
Append the public key to ~/.ssh/authorized_keys to let oneadmin user log without the need to type a password.
shell:cat ~/.ssh/id_rsa.pub >> ~/.ssh/authorized_keys
Many distributions (RHEL/CentOS for example) have permission requirements for the public key authentication to work:
shell:chmod 700 ~/.ssh/
shell:chmod 600 ~/.ssh/id_dsa.pub
shell:chmod 600 ~/.ssh/id_dsa
shell:chmod 600 ~/.ssh/authorized_keys
After you install the OpenNebula packages in the front-end a special dir structure will be created.
If you want to use advanced features as VM migration and test real-life scenarios you need to set up an NFS storage. We have set up the storage on one of our NUC’s since we did not have a third server just for NFS. The simplest way to achieve this is to export via NFS from the OpenNebula front-end both the system (/var/lib/one/datastores/0) and the images (/var/lib/one/datastores/1). They need to be mounted by all the OpenNebula virtualization nodes to be added into the OpenNebula cloud setup. OpenNebula nodes can be added at any time with the command (nodes are added on the front-end server):
shell:onehost create node01 -i kvm -v kvm -n dummy
OPNSENSE ROUTER CONFIGURATION
OPNSense is a free easy to use FreeBSD based firewall and routing platform. Since we did not have a physical router that we could configure we used a software router. Network routing is done by the OPNsense router. OPNsense can be installed on all virtual machines that support FreeBSD (such as KVM, Bhyve, VirtualBox). For that reason, one NUC has two physical network interfaces. One of these interfaces is exclusively used by the Router Appliance. Since the router is running on a virtual machine one NUC, the VM is supplied with the bridge, which is configured on the hypervisor node.
So for that to work we have to configure the network bridge on the NUC.
CentOS 7 comes with bridging module loaded on system boot by default, verify it by using below command.
shell:modinfo bridge
github:5ecb646bdc6dbcd31f051d3529cbce08
If the module is not loaded, you can load it using the following command:
shell:modprobe --first-time bridge
Install bridge-utils for controlling the network adaptors:
shell:yum install bridge-utils -y
Now create a config file named br0 in the “/etc/sysconfig/network-scripts/” folder. Type in the following content:
github:5b719fc4d3f73c36cd776da36a90653e
The process is identical for the second bridge interface br1:
github:9f4218d4d3f0ff9e23302d447fe37ee3
Now we have to edit the network configuration of the existing adapter to point it to the bridge interface. Open the corresponding file in your /etc/sysconfig/network-scripts/ folder. For our example we use these 2 files: ifcfg-enp0s25 & ifcfg-enp0s20u4. You can name your network interfaces the way you prefer just remember to edit the names and UUID’s in the configuration accordingly.
ifcfg-enp0s25 (interface on br0):
github:f9550a5c76496c2d0ceba3929a19b5c8
ifcfg-enp0s20u4 (interface on br1):
github:50fc871af37b9bee51c5c68759c2070a
Now restart the networking service:
shell:systemctl restart network
If everything went well you can view the new interfaces with “ifconfig” command (this will display all interfaces on your machine, not just the bridged interfaces) or use “brctl show” to just show bridge network information:
shell:brctl show
github:157cd5dc0df73fddc1f39ce477d699ed
ROUTER SETUP
If you are trying to install and configure OPNsense router you need to have console access to the VM since the config menu is accessed in the boot sequence.
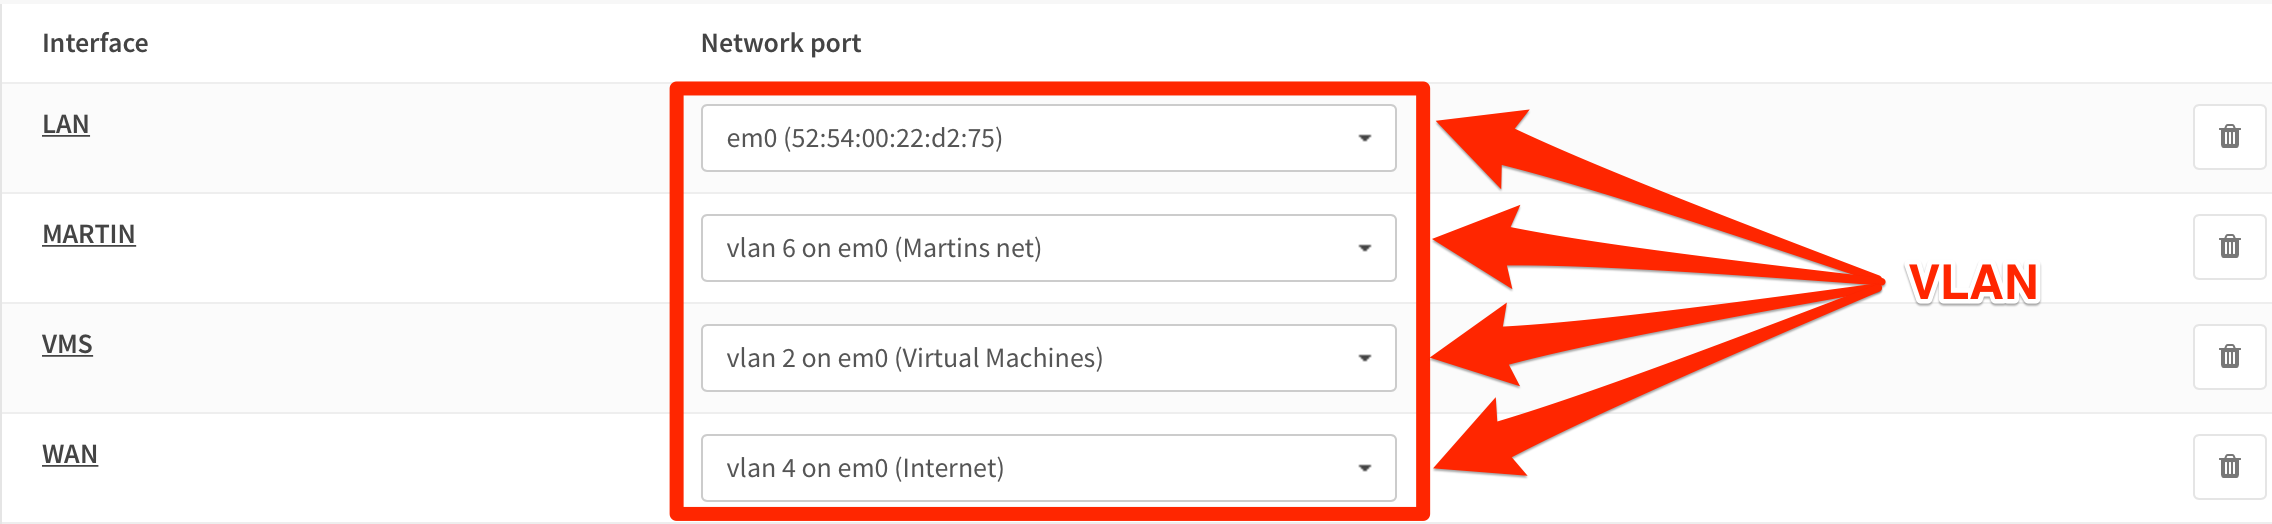
After the setup, we configured the appropriate VLAN’s and networks on the router. Due to this setup, the OPNSense VM is eligible to configure VLANs which are allowed by the switch.
The OPNsense router logical topology looks like this:

Remember: everything that you set up on the switch (for example VLANs, has to be configured on both the vRouter and the OPNsense router.
If you want to learn more about OPNsense, feel free to investigate the documentation.
VIRTUAL ENVIRONMENT SETUP
TOPOLOGY
We have set up our virtual environment so that the hosts are in one VLAN and the VM’s in a separate VLAN. OpenNebula has a nice option that visualizes the current network config through reading the vRouter configuration.
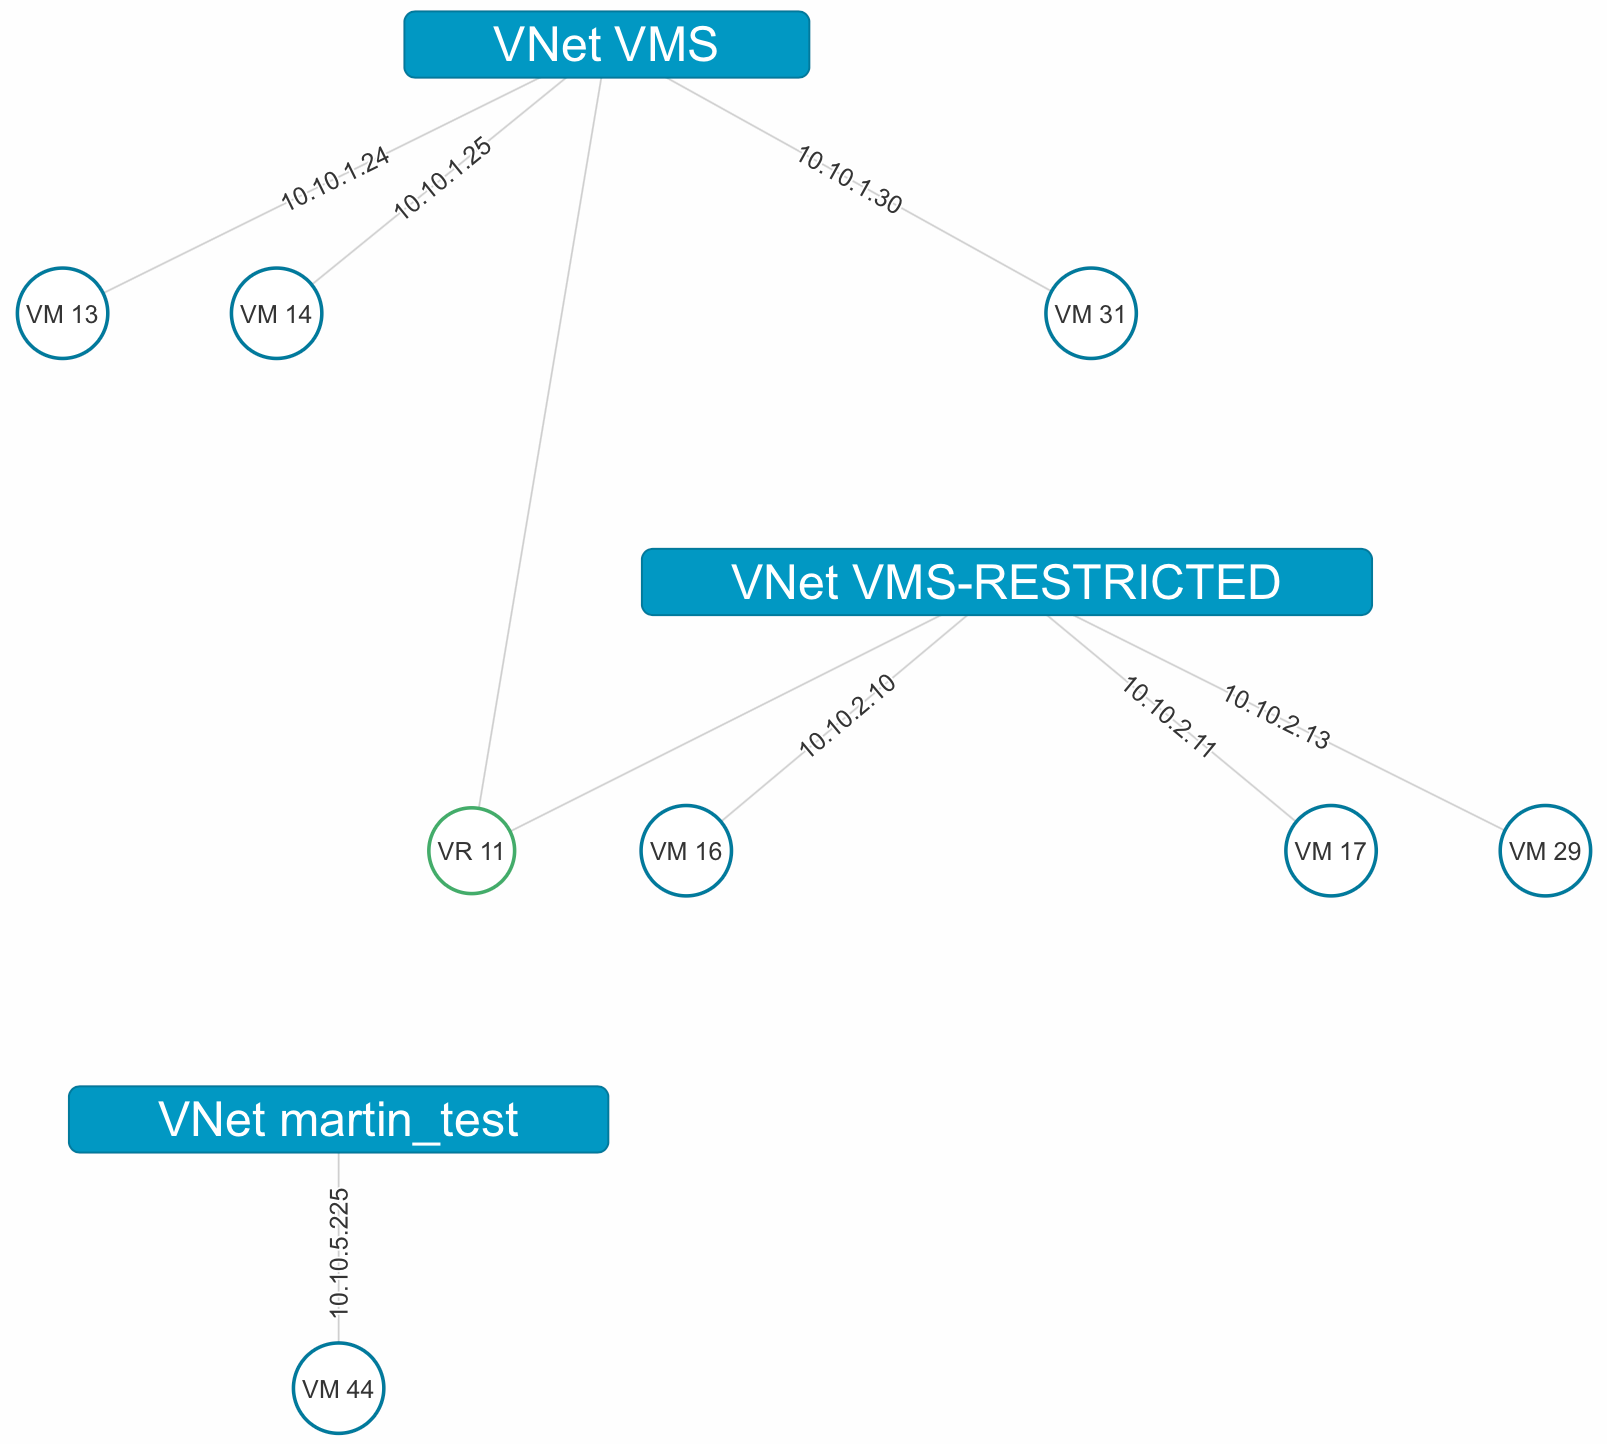
Notice how the vRouter automatically generates the view for easy visualization.
Now let’s see how the complete network looks like:
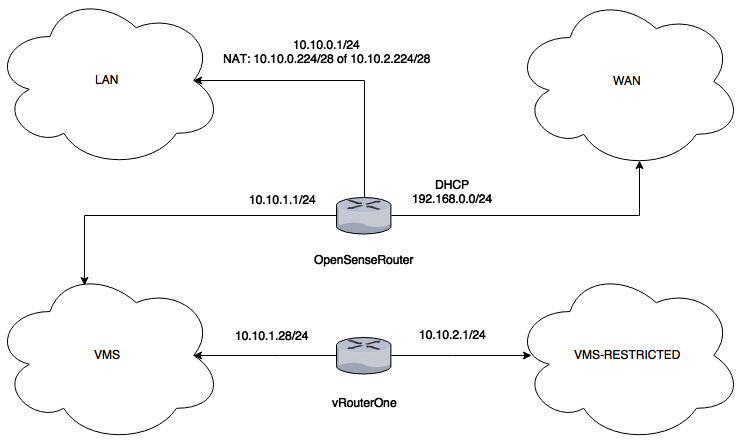
As you can see in the diagram, the OPNsense router connects the LAN, WAN and VMS networks while the vRouter connects the VMS and VMS-RESTRICTED networks.
IMAGES/TEMPLATES
First thing first. We need images.(breites Grinsen) After you upload your image files to the proper Datastore, you can start playing around with creating templates based on those very images. We have created several test templates for our lab setup. Template creation is easiest done through the GUI. If you missed something, you can edit the template at any time through the GUI or CLI.

Editing a template in a text editor looks like this:
github:06bc8ff7e825a64b2fbf306ae1f6789e
You can also create custom template configuration files and upload them directly into the GUI or through CLI.
INSTANCES
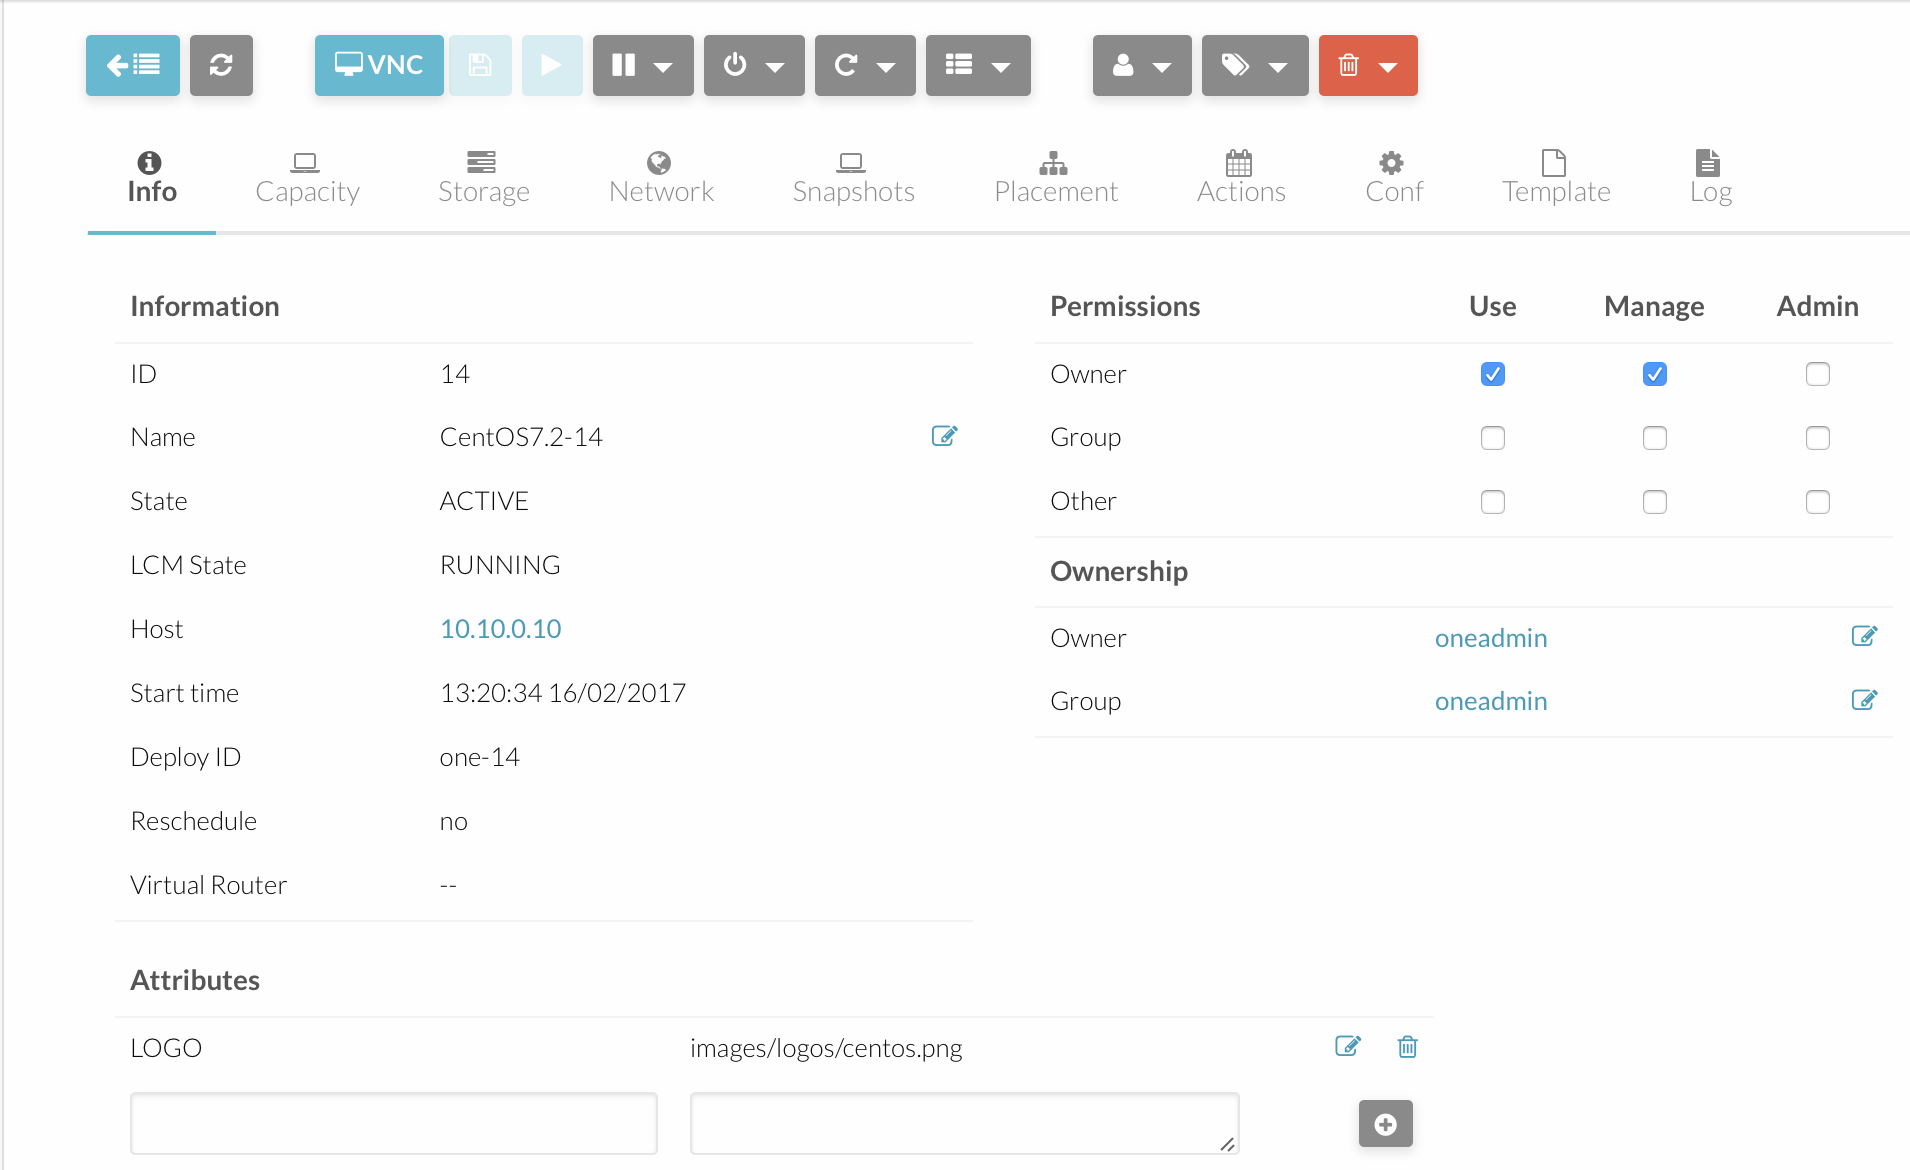
Now that we have created our templates we can provision VM’s. We have provisioned our VM’s using the OpenNebula GUI. After you choose your template (the base for the VM creation process) then you can define additional parameters as CPU usage, RAM and HDD allocation, networking and more. So to say, you can fine tune your VM before deployment. Afterward, we can view all sorts fo details in the GUI as well as in the CLI. A simple overview of a VM would look like this:
When done through the CLI it looks like this:
shell:onevm list
github:db0152bff8e70a5304b76c6cd6af255e
If you want to list the details of a VM through the CLI use this command:
shell:onevm show [vmID]
FINAL THOUGHTS AND VERDICT
As shown in the blog post, we have created a simple private cloud infrastructure that we can leverage to our specific needs. With OpenNebula we can build a simple and robust infrastructure that is focused on users needs and not on vendor specifics. Upon basic setup, user’s can already benefit from the installation because OpenNebula enables the user to be self-sustained and not to depend on System administrator or vendor to create and manage they’re VM’s. It is easily scalable and it can be installed on top of most hardware. It is the ideal choice for people who do have the hardware resources to go cloud but are only limited to private cloud for any type of reason. It is flexible and robust and easy to manage. It is the ideal piece of software for user-driven needs. If it is necessary, you can extend your cloud infrastructure even on to existing cloud providers since OpenNebula provides that capability.
